Gutermann Glue Update
Bureaucracy at its best! I’ve been in discussions and has been completely stressed out over this whole situation for the last 10 months! Due to bureaucratic and legal issues, Gutermann changed their adhesive formula to a water-based versus the original solvent-based adhesive. The new formula is opaque like Elmer’s glue. It comes in a smaller tube and is more expensive than the original glue. After months of experiments and gathering reviews, the new Gutermann failed to meet our expectations. In short, the bond of the new Gutermann glue is not strong and there’s been enough non-favorable reviews oversea that my Gutermann rep won’t make it available to me. Luckily, I’m able to get a replacement that’s almost identical to the original Gutermann glue. My Gutermann rep is recommending Hemline glue for pursemaking. He said it’s identical to the original Gutermann HT2 glue. Hemline is very popular and has been selling well in the UK crafting circle. I’m not sure how the glue is identical, because it can’t be, but the Instructions pamphlets for Gutermann and Hemline are identical (except for name change and duration of setting time), which I find it rather strange. And maybe that’s where the “legal” issue of these glue stem from?? Anyway, I don’t know the full story and Gutermann won’t share any more than what’s being published.
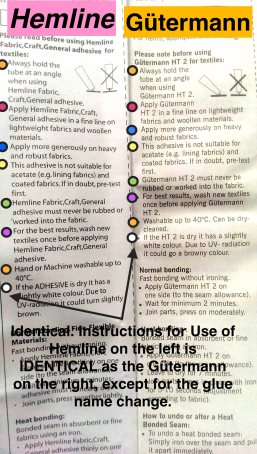
Here’s my review on the Hemline glue. I don’t think the original Gutermann HT2 and Hemline are identical, besides the same instruction of usage, because the Hemline glue is actually better. What??? Yep, much better I said! There’s no smell to the Hemline…yayyyyy!!
The setting time is at least 3X as long but the bond is MUCH STRONGER. REMEMBER to adjust your routine and give adequate time for the glue to set and you’ll find that it works better than the Gutermann HT2. 
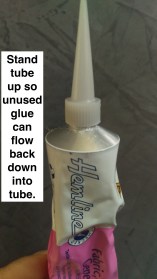
The included 3 plastic application tips allow you to cut the opening as wide, narrow, or slanted to your preference. The drawback to that is that you’ll have to remove the application tip in order to cap the tube. Major complaint with that is losing valuable glue that’s left in the application tip. My advice is to puncture and make a wide hole at the tube opening so that unused glue in the plastic tip can flow back into the tube more easily. Be careful not to cut the applicator tip too wide or large.
 Make wide opening/hole at tube.
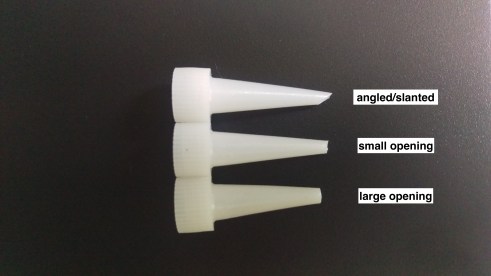
Cut a small opening that is about the same size as the original Gutermann HT2 glue metal tip for ease of use.

After removing the plastic tip, you can wash the tip clean with water. I use a toothpick to pick and scrape clean the inside of the tip. Lastly, I find the elasticity of the Hemline not as stringy and easier to work with than the Gutermann. In all, I like the Hemline better after thorough experiments with both glue.
Give Hemline glue a try! I welcome any feedback or questions. Please feel free to contact me directly at clutchframes@whilebabynaps.com
Kindly,
Thy
Striving for the best Customer Service
Recently, Etsy came out with a new feature for sellers. If you are an Etsy seller, you can see some key Customer Service Stats about your shop. What I really like about this is that it allows you to see where you can improve on or where you can keep striving to maintain. After all, people buy from people, and that is clear on a marketplace like Etsy where the focus is often on OOAK handmade goods.
I am beyond thrilled to see that from day 1 on Etsy (November 11, 2009), I (and Thy) have striven to be the best in Customer Service. The following takes into consideration our entire history on Etsy.

This demonstrates our strive to give you the best customer service so you keep coming back!
That is not to say we don’t make mistakes! We make plenty of mistakes. We fall down and get scraped sometimes. But we also get up and try harder to be better. Thank you for working with us and letting us make it right for you in the instances where we do mess up. Obviously, you know that it’s never intentional when we do get it wrong. It’s this reservoir of good-will that we never take for granted. 🙂
So for you Etsy sellers out there, check out your Customer Service Stats to see the areas where you can maintain or areas where you can improve on. This is a great tool and is worth your time!
~Winn
New Printing Intructions for the Classic Day Clutch!
I was recently contacted by two kind customers who had problems with printing out the Classic Day Clutch(TM) template. It did not print out true to size and scale than what was on the PDF file that they saw on the screen. It printed out on a smaller scale thereby making the pattern too small for the 8×3 frame, although it fit perfectly for a 7 x 2.5 size frame. It took me a while through several tech blogs and such but I figured out why it printed out on a smaller scale in some rare cases. I went ahead and made the change for everyone just in case this happens to someone else.
Let me explain what happened in these two cases: Adobe did not process it correctly during printing and shrunk it to fit the page. My original file as seen on the screen when downloaded is the correct size and scale: however, when it goes to print it, it sometimes shrinks it. Funnily enough, Adobe does NOT do this for any of the other 6 templates — only for the Classic Day Clutch in these 2 instances! And furthermore, my own printer setting was on “Print as Image” so it did not shrink it for me. It always prints true when I print it on my printer so I did not “catch” it every time I printed this template out to sew and make my clutches. So all my clutches using the Classic Day Clutch template came out exact.
How do you prevent printing a scaled-down version? (It is hard to tell that it was shrunken.) Printing a PDF file as an image bypasses that processing by sending the printer a simple image of the document instead. To ensure the correct scale that is printed, please print the Classic Day Clutch(TM) via the following these steps:
With the PDF file open in Acrobat Reader or Acrobat, from the File menu, click Print.
In the Print window that appears:
>Windows: Click to check the Print as Image check box.
>Macintosh: Click the Advanced button, and click to check the Print as Image check box in the Advanced Print Setup window.
Click Print.
You can do this method to print out any PDF file if you want to ensure that it prints true to what you see on the screen. I want to thank the two ladies for contacting me with this issue. By making these new printing steps for everyone, it will ensure that no one else will run into this problem. I am not sure why others, like myself, did not encounter this problem prior as it has never happened before. (?) I am not sure if the different Adobe versions or the different Mac vs. Windows platforms make a difference. However, I do know that I feel VERY lucky that they contacted me!

I sell a lot of these kits because it’s a good clutch, but also due to the photo. It’s a good angle and shows off the clutch well.
Thanks
Winn 🙂
How to sell your clutches with an in-home crafts fair.
I get all sorts of emails from my wonderful and loyal customers, and sometimes there is great information that I think other customers can benefit from. Like Erin who offered her great tips about selling at arts and crafts fairs so that others could benefit from, Susan of Lulu Caswell has graciously offered some tips for you to have success selling clutches at your in-home crafts fair.
With two years of selling her clutches at her house, Susan has wonderful helpful tips. In fact, she sells the majority of her clutches off the Net! Here are some tips:
1. Invite other craftsters to display their goods in your home. More will come when you have a house party for handmade clutches, jewelry, and quilts (for examples) than just clutches alone. Susan sold nearly $1000 in clutches on one Sunday from 12-4pm! With this, she was able to pay off her husband’s tuition for one month. GO Susan!!!
2. Promote amongst your friends via your social networks of Facebook, Twitter, Google+, etc… Be sure to ask them to come (don’t be shy!) and to share the post with their friends. How about “Hey, I would love for you to come. I would really appreciate your support and would love to see you and catch up over some munchies while you check out all the goodies! If you cannot come, I would appreciate your support by sharing this post on your Wall with your friends.”
3. Go on to Etsy and solicit other local craftsters/artisans to display their goods at your in-home crafts fair. Susan didn’t know most of them, but that didn’t deter her from asking them to participate in her second year. She had 6 other vendors join her at her home and about 40-50 guests who came, even some customers from the previous year. These things build so hopefully she will have even more attend next year.
4. To get more foot traffic and eyes, create a flyer and post them at local churches, at the kids’ schools, and at the local community hall. Ask the other vendors to do their share of posting the flyers and promoting the event to their network of friends.
5. For a smaller, intimate affair, do an evening show with just your clutches and serve wine and cheese. Email it to ALL your girlfriends and ask them to pass the email to a girlfriend and to bring a girlfriend!
Selling your clutches at your home is just another avenue for you. It is one that costs very little (take out that folding table and throw a nice sheet to cover as table linen!) yet is one that will allow customers to get to know you. People buy from people, and this direct selling has worked for the biggest companies like Avon, Mary Kay, and Lia Sophia.
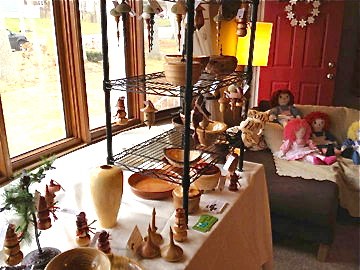
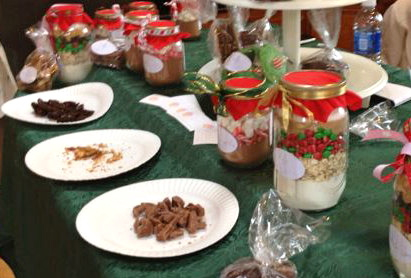
Take a look at some of the pictures from her last in-home craft fair.

Susan’s sumptuous table of clutches. Look at all the variety of colors and textures!

This paper maker did really well.

This craft fair was held before the holidays. These would make great gifts for a little girl!
The woodworker also sold really well!

I can smell these scents through my screen!
The woodworker, the baker, and the candlestick maker? 🙂 The baker brought her goodies, too!
I want to thank Susan for her generosity in sharing these tips with her fellow clutch makers. If you are a fellow artisan in the Fall River, MA area, be sure to contact Susan at her shop to plan the next in-home craft fair. You’ll be glad you did!
Selling to holiday shoppers
Now that many of you have loaded up on your metal purse frames and Gutermann glue from my annual sale, I am sure you are well on your way to making your clutch collection for the holiday season! Selling your clutches at a Arts and Crafts show is a great way to find an audience! Here’s a post I did about juried and non-juried shows.
Since the holidays are right around the corner, you will need to get a move on in order to participate in these shows. They typically sell out fast because everyone comes with a Christmas list. So go to the arts and crafts directories and check out what’s going on around you in your state. Enter in the dates (month, year) as you would normally. There’s no directories geared just for Christmas but once you find your date and state, then it lists all the holiday festivals coming up. All these shows, especially big ones fill up fast for the holidays, so be sure to check them out and register.
*Festival Network Online: great directory for juried shows!

I’ve been to the juried show shown here on the home page of this directory. It was really amazing art and the price point was higher than other non-juried shows.
*Arts & Crafts Show Yellow Pages: this might be the most comprehensive one out there. You can get some sample listings only on this fee-based directory. Membership is $48.95 a year.

Any crafter will benefit from these Yellow Pages.
*Fairs and Festivals: I like the navigation and info on this directory. It gives you enough info, but important details are only for members. Check the website for membership.

Sample of one event in NJ in December.
As you know, I’ve talked many times about supporting other women and how that is a worthy endeavor and you can never go wrong supporting a woman. I just had a wonderful suggestion from an experienced clutch maker and clutch seller who has done many of these local arts and crafts shows. Erin of kaleidoscopebyerin brought up an excellent point that she thought all fellow clutch sellers could benefit from. Erin suggested to find out the range of retail prices of the products offered by participating sellers at these shows before committing to the shows. How can you find out?
*Find out if it’s a juried show or not. Non-juried shows are typically lower on price points than juried shows. Some juried shows might be too high, too, so do your homework!
*Talk to the event contact person to find out past vendors, types of products shown, and range of price. Unless it’s a brand new event, they should have a clear idea of the historical range and median price of displayed goods. They will also know who has signed up this year and what things are being promoted.
What you are trying to find out is the audience of these shows. What kind of customer is coming? What kinds of products and price range have they expected at this show in that past? Erin says that “the venues are out there, I promise…” Based in Raleigh, North Carolina, Erin’s experience with shows that have a lower retail price range can yield as little as only $100 a day in sales; however, if she targets and hits the right price range in an upscale show, she has sold as much as $1000 a day. What’s really encouraging is that arts and crafts shows are still an untapped market for handmade clutch sellers.

Here’s a picture of her set-up from a show. Notice the branding that she does! The banner is the same as her online shop so that customers who sees her at the show can return again to her online shop. Her niche is handmade clutches using unique vintage kimonos. See how she has accoutrements that amplify the look? The rice-paper screen and umbrella complements the kimono clutches. You walk past her table and you are drawn in by the props and visuals. The angle of the screen invites you to walk further in for shopping. Brilliant!

The screen is ingenious!
I hope you find Erin’s suggestions helpful. As a mom of 2, Erin is a true team player and understands the juggling of work and raising kids! I want to thank Erin for her kindness in offering her experience for you to benefit from! Thanks, Erin. You’re the bees knees!
~Winn
Tips for your digital camera
I get asked questions about how to improve many shop’s listings and product photos. I have helped several shops make improvements on their photos and their sales have increased. While my talent in photography lies in close-ups of jewelry, I continually work on developing my other skills.

One of my favorite shots from my jewelry shop. So sparkly.
However, I currently only use a simple point-and-click digital camera that is about 7 years old. It’s a little dented and is not fancy but does the trick. It’s not doing justice to my wide shots, in low-light conditions, or shots with any movement since I have no shutter speed to work with but for a straightforward, non-moving target, I get a lot out of an old cheap camera.

Sometimes I can time it right and get an "action" shot.
I use iPhoto on my Mac to straighten, sharpen, brighten the shadows and the overall exposure. Sometimes, all I need to do is hit the “Enhance” button and instant improvements are done! However, if I start with an out-of-focus, badly lit shot, there’s not much I can do. But here’s a sample of where a little straightening (ok, a lot), cropping and better exposure can improve a terrible photo.

Before. I was laying on my side trying to snap the view. Makes you kinda dizzy...

After
For your clutch shop, I recommend taking time to set up the shot before you snap. In fact, the majority of your effort should be spent on setting up the shot with the right lighting, backdrop, and positioning. Here’s one of my favorite shots of my clutch kits.

I sell a lot of these kits because it's a good clutch, but also due to the photo. It's a good angle and shows off the clutch well with good focus on the subject. You can even see the texture of the fabric.
I just ran across an article on camera tips so click on the pic below to get to that article. I hope it’ll help you in your picture taking!

Click to read full article.
If you’ve got any good tips, I would love to hear them!
~Winn
Paypal is throwing down with Square — and YOU benefit!
Exciting news! Paypal is going to introduce their own mobile paying device that will be similar to Square. Please note: SquareUp.com is the domain name that the company “Square Inc.” or “Square” uses. SquareUp, Square Up, Square up, and Square are all used through the media interchangeably. They really should just change their main domain to Square.com. I don’t know why they are doing the reverse and directing it all to SquareUp.com … anyways … just my humble opinion. 🙂
It is not yet known what features it will offer beyond those of Square, however, Paypal will have a lower transaction fee thereby undercutting what Square is currently charging.
Will Square answer back by lowering their transaction charge rate as well? It’s yet to be seen, but this is very good news for small business owners, mom and pop shops, and those of you selling your clutches at arts and crafts fairs and bazaars. It will be ubiquitous and your customers will be able to pay you with their credit cards. You will be able to accept credit cards easily without any start-up or ongoing maintenance costs!
Check out the article.

More companies offering mobile payment devices means lower charges you'll have to pay!
Since Paypal is the #1 online credit card payment processor in the world, this news is huge. The public trust is there with paying via Paypal’s secure encrypted network. So for Paypal to come out with this mobile paying device, the adoption rate will be high. It will probably link up with your existing Paypal accounts and you’ll have all your payments at one source. This is seriously going to effect Square and I anticipate them doing something to mitigate this.
If you haven’t used Square already – a free device – I would like to poke a hot poker and get you to try it out. Did I mention it’s free? 🙂 You can grow your business and craft fairs, school and church sales, home hostess parties ….
Oh, and it’s free.. 🙂
Big changes coming for consumers and retailers…
I swear Jack Dorsey doesn’t need the additional press, but I just love where he and the team at Square are headed. It’s going to revolutionize the transactions between retailers and consumers.
Over a year ago, I blogged about how you can easily and without any upfront costs accept credit cards via SquareUp. Read this post to refresh. I further expanded on that with crucial business tips for you at this post. I then updated you with SquareUp’s changes allowing you to accept more than $500/month. (This was my sticking point.)
So now comes an industry changer. Square is coming to replace registers nationwide. (Click on image to get to full article.)

This will change customer's expectations, and therefore, behaviors.
Why does this matter to you? Because:
1. The majority of merchants in the US will buy and use a tablet or a mobile Point of Service device. This means you, the consumer will start to see this in stores like bookstores, coffee shops, boutiques, bridal salons, nail salons and the like. You, the consumer will become acquainted and trust this new way of paying for your goods and services. The old register will be seen as antiquated because of the ease and flexibility of a mobile point of service device. It’s like that kitchen phone that hung on the wall with the spiral cord that always got twisted and you had to untwist it (that was kinda fun, though). It was the central location to make your calls but you were tethered to it. Even house phones of today are cordless. We wouldn’t even think of buying a phone with a cord. Not sure if they sell them anymore…. If you have been to an Apple(R) store lately, you will see that they use a mobile POS. It’s really amazing how easy and consumer-friendly it is. You no longer feel like cattle at the trough.

2. Because you, the consumer, don’t have to carry that amount of cash (who wants a Constanza wallet? 🙂 ) you can buy more knowing that merchant at the crafts fair will accept your credit card. The average transaction is $75!!! Research has shown that transactions are larger (ie people buy more) when they use a credit card vs. cash. So a mobile POS device can also increase your dollars collected.

So because of Square coming into shops in this year to replace the register, you can expect that the adoption of the SquareUp device will ramp up quickly. If you are showing your clutches at an Arts Fair or Craft Show, I highly recommend getting a SquareUp device. It’s free, it’s easy and you start accepting credit cards with your mobile phone. You will have an advantage over other sellers if you accept credit cards and they don’t. What’s more? You don’t have to shell thousands of dollars for the upkeep of those machines, buy ink, buy paper, etc… You don’t have to spend anything to start accepting credit cards.
Good luck and if you’ve tried it, convo me and let me know how it has worked for you. If you haven’t, then why not?
~Winn
Helpful Hints: URLs contained in the Clutch PDF tutorial.
Thank you to a wonderful and loyal gal who brought to my attention a problem with one of the two URLs listed in the tutorial. It seems that when it’s straight copy and pasted from the PDF, something is amiss in the translation and you end up in the “It seems like you are lost” cul-de-sac.

No, I'm not lost. You took me here.
The URL in question is here on page 23.

Troublesome URL highlighted in blue.
The problems:
1. What you see on screen and highlighted in the PDF is not what gets copied and subsequently pasted into a new browser window. Adobe’s copy/paste function is omitting one key character “-” the dash between “helpful” and “hint”, and also adding extra spaces …. which then routes you to a dead end. I’ve taken a screen capture below of what is exactly pasted.

Something got messed up ... See how this doesn't match to the URL highlighted in blue above?
2. Going the other route to access the URL — when you highlight the URL and click on the highlighted portion (in blue) and open in a new browser, Adobe adds a stem at the end for no reason (other than to mess with you). It adds “Sides” to the end of the URL string.
The solutions:
A. Type in the URL exactly as you see it. But this is cumbersome, however, it will work.
B. In the blog, search “Gutermann glue” in the Search box. Lots of previous posts will appear, but look for the one with that title and date. All my blog posts are listed and can be found by date, name, search terms, tags, etc…
C. OR Follow the steps below:
Step 1. Highlight the URL in the PDF and click on the highlighted portion as shown.
Step 2. A pop-up box will appear. Click “Allow”

See how it adds a stem at the end and doesn't match what you highlighted? This will also lead you to a dead end.
Step 3. When you get to the dead end, go to the URL at the top and erase the word “Sides” that was added at the end. Hit enter.

I've highlighted the entire URL here in green. Erase just the last portion "Sides".
Step 4. Now it will lead you to the right post as shown below:

Once the "Sides" wording has been removed, you end up at the right spot.
The other URL is not at all changed by Adobe. Not sure why one works as-is during the copy/paste, and one doesn’t.
Hope that helps!
Winn
Minor edits to 3 pages. Get it now!
Hi ladies –
There are 3 minor revisions on the following pages that were not caught in the previous go-arounds. If you are among the 500 or so who just grabbed the latest updated tutorial, please go to the post here and download the tutorial again. The 3 pages that were changed ever so slightly were pgs. 13, 21, and 22. You can just print out those pages if you like. I hope these minor, yet important, changes will help to provide clarity.
Please note:
*that the most recent version is always at my blog at the password-protected post. Any time I make changes or additions, I also let everyone know ahead of time and give you the go ahead to access it via this blog.
*please copy and paste the URL in its entirety to access the posts referenced (interface and glue) in the tutorial. I’ve tested the URLs several times and they will lead you to the correct posts mentioned. I’ve not removed those posts.
Now that my eyes are completely cross-eyed from looking at this tutorial for all these weeks and hours, I think I’ll give them a rest.
Thy just made a clutch trying the Bottom Seam way with the new Shortcut. It took her 40 minutes from start to finish to make a clutch using our aunt’s old sewing machine at 1 in the morning. (Hey, you work when you can and the kids were sleeping!) 🙂 You moms know how it is …
She found that the Shortcut way made it easier to invert the clutch right-side-out (fewer wrinkling) and made for easier insertion into the purse frame. Try it out let me know how it works for you!
Have a great weekend!
Winn
About
I am the #1 US seller of purse frames and I’ve been incorporated since 2001. This blog is mainly aimed at my audience of clutch handbag makers. I have a very small niche that is comprised of 99.9% women. I am loyal and promote handbag makers who are loyal to me by using my fine purse frames. When they are successful, then I am successful.
The two businesses that I own are:
*purse supplies, Gutermann glue, and DIY clutch kits at whilebabynaps.etsy.com, whilebabynaps.com
*up-cycled purse supplies PurseFramesOutlet.etsy.com
To find clutches made using my fine metal purse frames, LOOK to see “Trademarks of WhileBabyNaps.com and H&D LLC” and you’ll know the clutches are made using the finest metal purse frames that are tested for lead and that have a protective coating to lengthen the life of the clutch. You can go to any of the sellers on the Sellers page.
****NOTE: If you want someone to make a clutch for you, please contact any of my sellers and inquire. They will gladly make custom orders!****
Interested in reaching my audience? Advertise. Contact me here.
Thank you for stopping by for a look.

Warmly,
Thy Khuong
-

My Etsy shop

#1 US Seller of Purse Frames
My Main shop

Wholesale purse frames for clutches
Grab My Blog Button
 <a href="http://www.whilebabynaps.etsy.com" target="_self"><img src="https://clutchme.files.wordpress.com/2012/10/etsy-shop-button.jpg" alt="WhileBabyNaps" width="150" height="150" /></a>
As Seen…

Your Ad here